

Creating a color ramp using color modifiers in Tokens Studio | by Katie Cooper | Jan, 2024
[ad_1]
Start by adding a base color token by giving it a name and entering the hex value in the color field. Only do this for one color because we will duplicate this ramp to create the other colors later.
4. Add the remaining colors with a modifier
Let’s add our remaining colors within this color ramp, including the modifier tokens we created earlier. For the following example, let’s add a color one stop lower than our base.

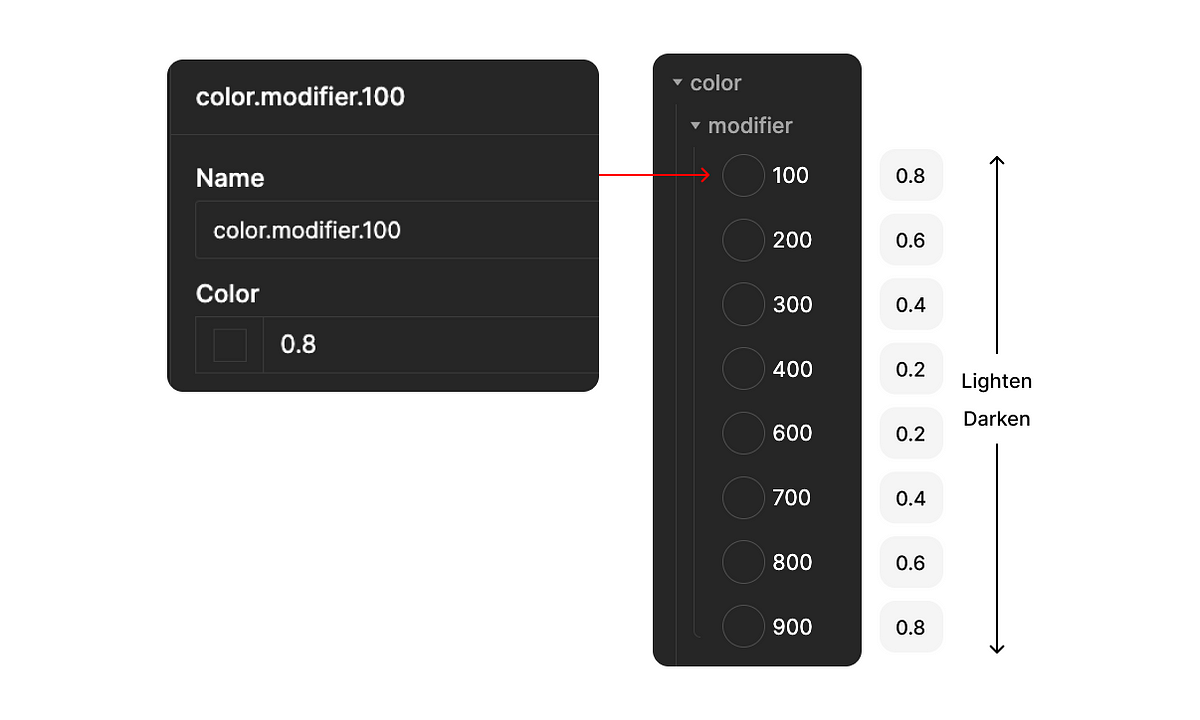
Name field: Add the name of the new token you’re creating, color.red.400.
Color field: Reference your base color, {color.red.500}.
You’ll notice a plus icon button across from the “Modify” label. Click that, and it will reveal the options to modify your base color.
Modify selects: Lighten for colors lower than your base and darken for colors higher. There are a variety of color spaces to work with. I have found the best consistency with lch.
Amount: Reference your color modifier token relevant to the color you’re creating, {color.modifier.400}. It may say “Not found,” but it will work, and you’ll see the base color adjust.
Save it, and a new token will appear in your color ramp. Repeat this process for all your colors.
Don’t forget to set the modifier select field to “darken” for colors higher than your base! It is set to lighten by default.
5. Create all remaining color ramps
I’ll admit this part is a little tedious, but any future adjustments will be easy-breezy.

To add a new color ramp, duplicate the ramp you just created. All you’ll need to do is edit the value of the base color and then adjust the remaining colors to reference that color.
6. Making adjustments to the color ramps
When making adjustments, you’ll either edit the value of your base colors or modifier tokens.

During a contrast ratio check, I may realize that my 900 color stop needs to be a tad darker. No problem! I’ll jump in and increase the value of my color.modifier.900 token.
While exploring color application on a mock-up, I may realize that the colors appear too saturated. No problem! I’ll go back to refining my base colors and adjust the base token values.
I no longer need to worry about adjusting every single stop because I know each color stop will be consistent across all colors.
In Conclusion,
This is a great method for fast iteration once set up, but it’s not perfect for every project. Experiment and decide if it’s right for your design system.
- Create your base colors and aim for consistent lightness and saturation.
- Create the modifier tokens.
- Add your base color to start your first color ramp.
- Add the remaining colors and reference them to a modifier token.
- Create all the remaining colors by duplicating your first ramp and change the reference values.
- Make adjustments as needed.
If you want to learn how to create color ramps manually where you have more control over every color stop, check out “How to create a color ramp used in design systems.”
[ad_2]
Source link

")